Dropzone 5 Updates
Dropzone 5 has come a long way since it launched in March. There have been 10 updates since then, each bringing new features and functionality.
With the release of 5.1.0 we thought it would be a great time to showcase some of our favorites. Let’s dive in.
Automatically add screenshots to Drop Bar
This is the headline feature of the just released 5.1.0 update. There’s a new Drop Bar section in Dropzone’s Settings that brings all the Drop Bar related options together in one place, and it includes a powerful new capability: Dropzone can now watch your screenshots folder and automatically add new screenshots to Drop Bar.

Just enable ‘Automatically add screenshots to Drop Bar’ and every screenshot you take gets added to Drop Bar, ready to drag into an email, AirDrop, or anywhere else. You can choose which grid screenshots get added to, or leave it set to ‘Current grid’ to have them added to whichever grid you’re currently using.
But it gets better – you can also set an action to run automatically on every new screenshot using the ‘Run action with new screenshots’ option. Pick any action from your grid and Dropzone will run it each time a screenshot is taken. Some useful workflows:
- Run the Imgur action to instantly upload each screenshot and get a shareable link on your clipboard
- Run the Resize Images action to automatically scale down retina screenshots before sharing
- Run the Remove Image Metadata action to strip metadata before a screenshot goes out into the world
By default, Dropzone shows a notification before running the action so nothing happens unexpectedly – just click on the ‘Run’ button in the notification to run it.

If you’d rather have the action run instantly on every screenshot, you can turn off ‘Confirm via notification before running action’ in the Drop Bar settings. There’s also a ‘Keep screenshot in Drop Bar’ option that controls whether the screenshot stays in Drop Bar after the action has run.
The new Drop Bar settings section also now includes an option to automatically close the popped out Drop Bar when the last item is removed from it. This makes the floating overlay even more useful – once you’ve finished with your files, it immediately disappears rather than taking up screen space.
New Grid Editing in Settings
Grid editing in the Settings > Grids tab has been completely redesigned. Double-clicking a grid (or selecting it and clicking Edit) now opens a new grid options editor:
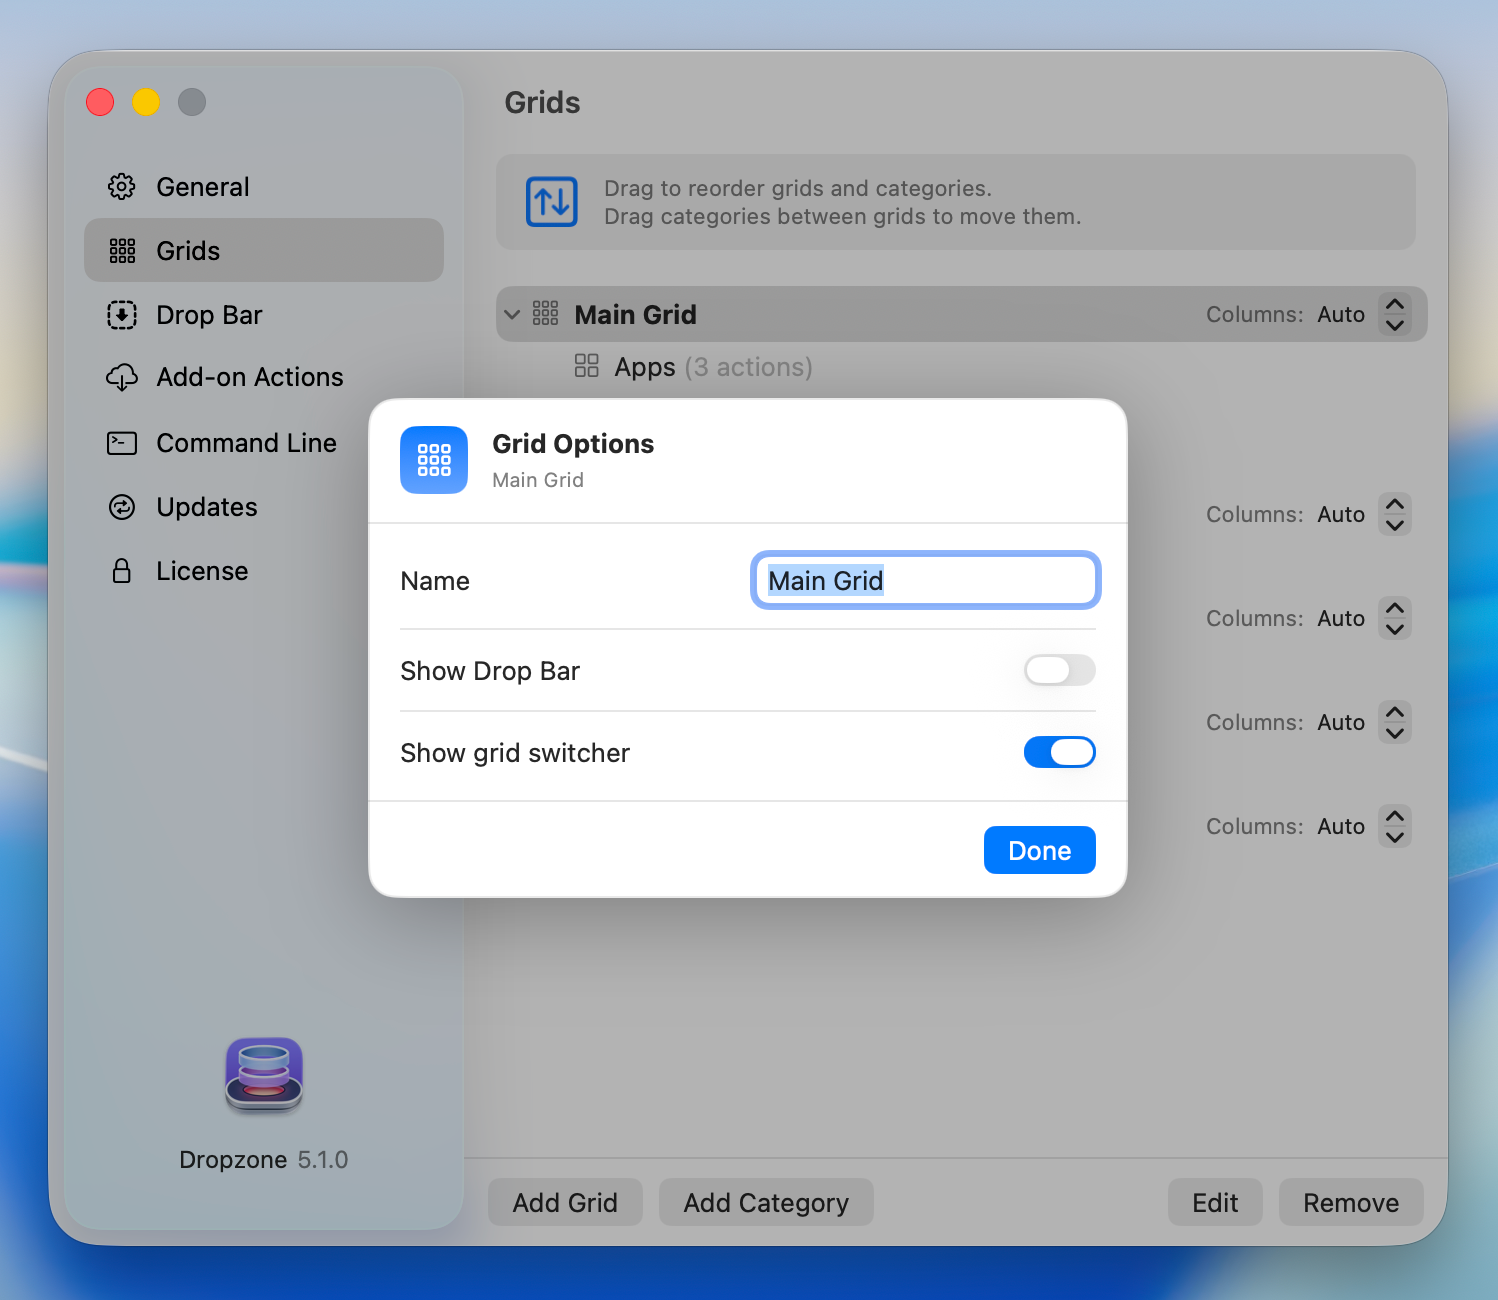
From here you can rename the grid, and there are two new per-grid visibility options: ‘Show Drop Bar’ lets you hide Drop Bar on grids where you don’t need it, and ‘Show grid switcher’ lets you hide the grid switcher at the top of a grid. These are handy if you want a clean, minimal grid that only shows your actions.
Faster Grid Switching
Switching between grids is now much faster with two new sets of keyboard shortcuts. With the grid open, you can press the left and right arrow keys to instantly flick between your grids. You can also jump straight to a specific grid with ⌘1 through ⌘9 (and ⌘0 for the tenth grid).
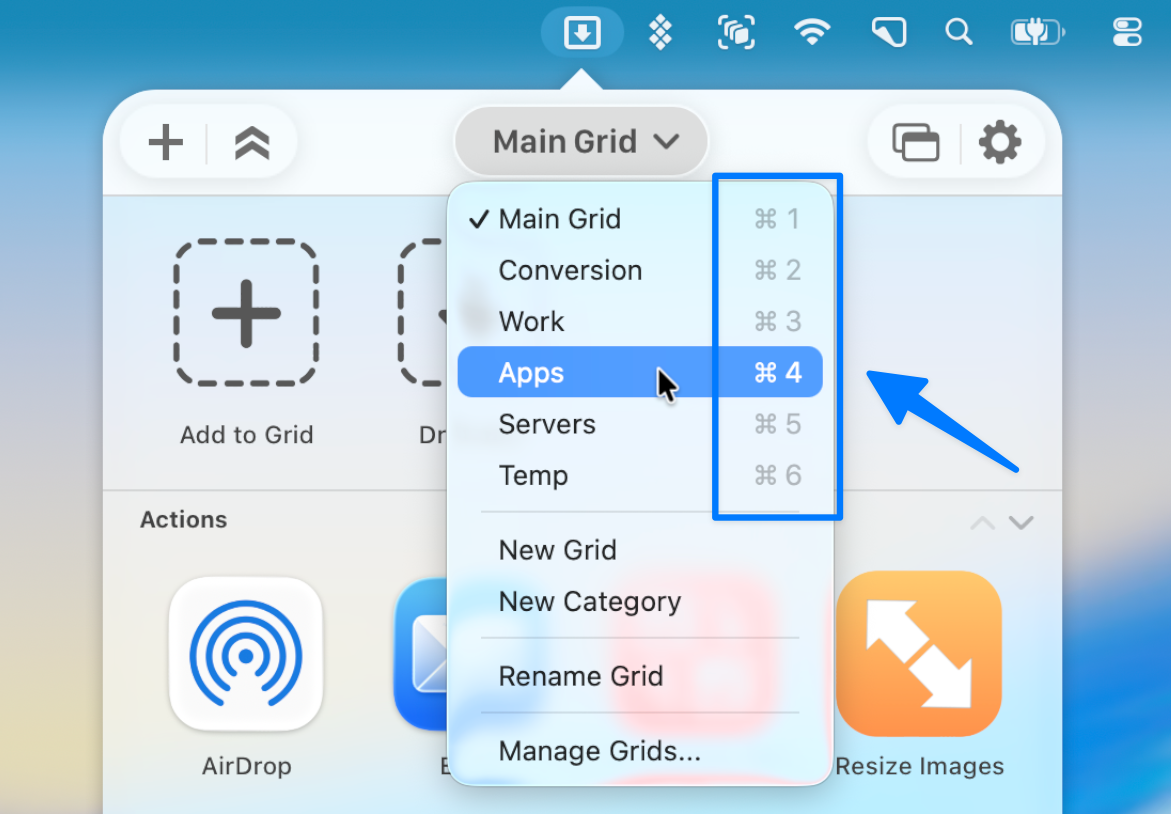
Best of all, these shortcuts work while you’re dragging files. So you can pick up a file, summon the Dropzone grid, hit ⌘ and the grid number to jump straight to the grid you need, and drop the file on an action – all without interrupting your drag.
New Open File Action
Dropzone grids have always been able to hold folders, apps, and actions – and now they can hold files too. The new Open File built-in action lets you add any file to your grid and open it in its default application with a single click.
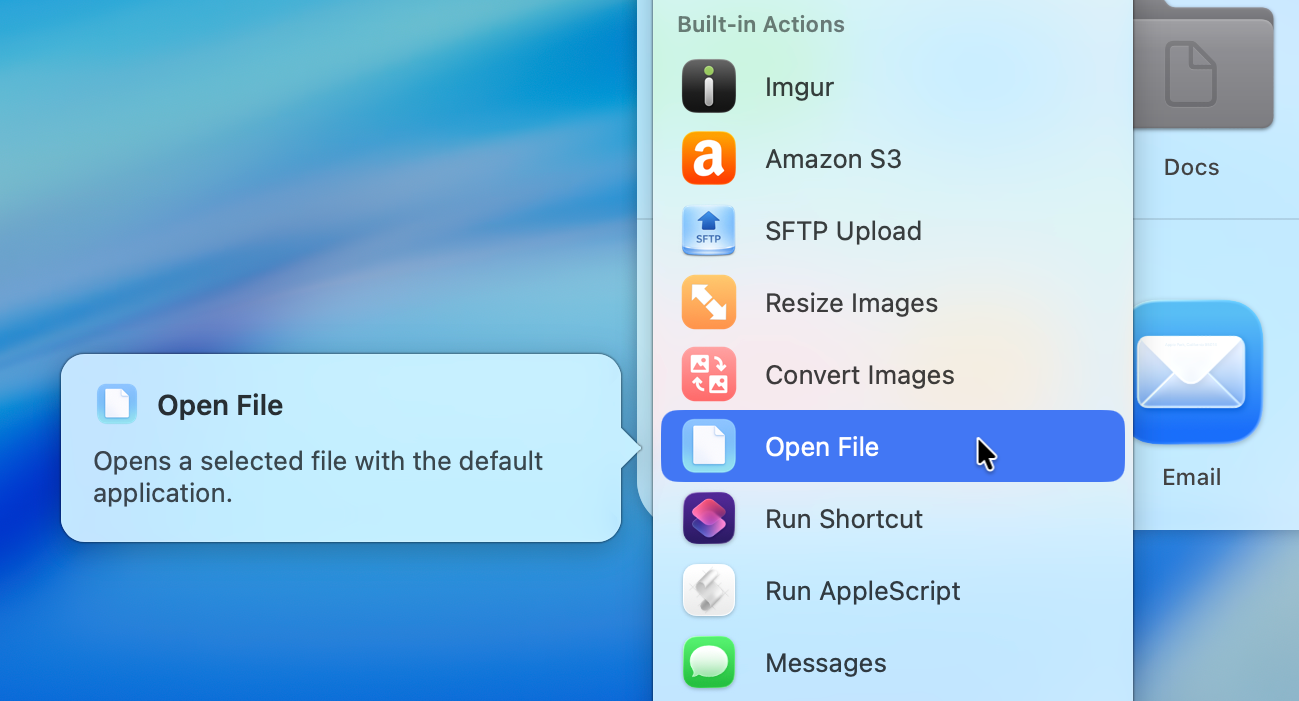
The easiest way to use it is to simply drag a file onto the Add to Grid area, just like you would with a folder or an app. You can also add it from the add action menu. It’s perfect for that spreadsheet, design file, or notes document you open twenty times a day.
Drop Bar Tooltips for Long File Names
Drop Bar items with long file names get truncated to fit in the grid, which previously meant there was no way to see the full name of an item without using Quick Look. Now you can simply hover over any truncated Drop Bar item and a tooltip appears showing the full name:
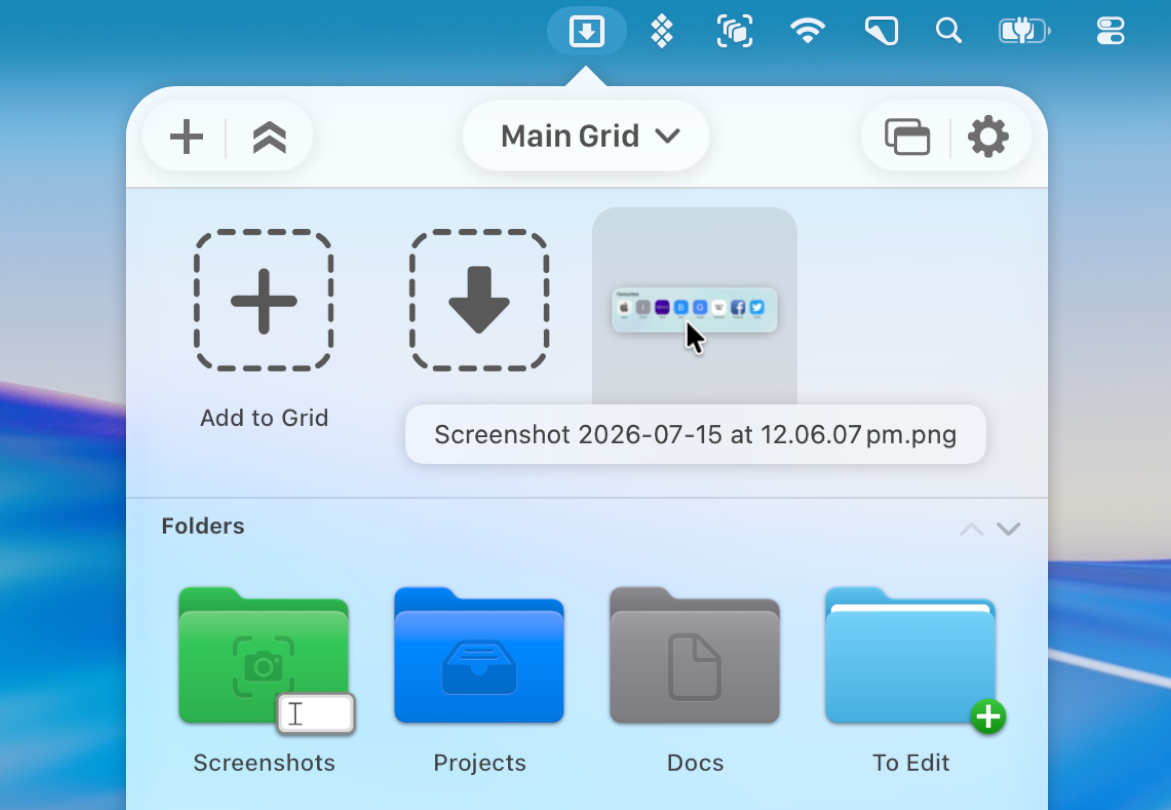
It’s a small thing, but if you keep a lot of files staged in Drop Bar it makes it a lot easier to find the file you need.
Tons of Command Line Tool Improvements
When we first introduced the dz command line tool, you could run actions and manage Drop Bar from the terminal. Over the last few updates, dz has grown into a full remote control for Dropzone. The three biggest additions:
You can now add actions to your grid from the command line. Use dz list-action-types to see what’s available, dz action-info to see an action’s configuration options, and dz add-action to add it to a grid, fully configured. For example, here’s how to add a Resize Images action:
dz action-info "Resize Images"This shows the options the action supports:
Resize Images
-------------
Resizes dropped images to fit within a given width and height.

Can also reduce image file size when outputting to JPG or WEBP by changing image quality.

Options (set with --set key=value):
  output_width (optional)
    Maximum output width in pixels
  output_height (optional)
    Maximum output height in pixels (at least one of width/height required)
  output_quality (optional, default: 100)
    Output quality 0-100 (applies to JPG and WEBP)
  output_format (optional, default: 0)
    Output image format: 0=JPG, 1=PNG, 2=TIFF, 3=WEBP
  output_folder_option (optional, default: 0)
    Where resized images are written: 0=same folder, 1=ask each time, 2=pre-selected folder, 3=Drop Bar
  ...
Then add the action with your chosen configuration:
dz add-action "Resize Images" --name "Resize to 1200px" --set output_width=1200 --set output_format=JPGThe action instantly appears in your grid, ready to use. This works for built-in actions, add-on actions, and even your own custom actions.
You can move actions around from the command line. The new dz move-action command lets you move any action into a different category, or even a different grid entirely:
dz move-action "Resize to 1200px" --category "Image Tools" --grid "Work"You can configure grid settings from the command line. The new dz grid-settings command lets you view and change a grid’s name, column count, icon size, and Drop Bar/grid switcher visibility:
dz grid-settings "Work" --cols 4
dz grid-settings "Work" --drop-bar hide
There’s plenty more too: you can install and uninstall add-on actions (dz install-action), create and remove grids and categories, set custom icons for actions (dz set-icon), name Drop Bar stacks as you create them, and check on or cancel running actions. Type dz help after updating to see everything that’s new.
All of these CLI additions makes Dropzone perfect for agentic workflows. Since grids and actions can be created and configured entirely from the command line, you can have an AI agent like Claude Code set up Dropzone for you – just describe what you want and it can build a complete grid of pre-configured actions by running dz commands.
Now Localized into Italian and Japanese
Dropzone 5 is now fully localized into Italian and Japanese. These join English, German, French, Korean, Polish, Thai, and Simplified Chinese, bringing Dropzone to nine languages.
Get the Latest Version
All of these features and more are included in Dropzone 5.1.0, which is a free update for all Dropzone 5 users. You can see everything that’s changed in the full release notes.
To update, open Dropzone’s Settings and head to the Updates tab, or download the latest version from our home page. Some features, like automatic screenshot handling, require Dropzone 5 Pro – you can try Pro free for 14 days. We have also extended the launch discount, so now is a fantastic time to get Dropzone 4 Pro with a 30% discount.
We’ve got plenty more planned for Dropzone 5. If you have any feedback or questions, feel free to drop us a line at support@aptonic.com.
Dropzone 5 Released
Today, I’m thrilled to announce the release of Dropzone 5.
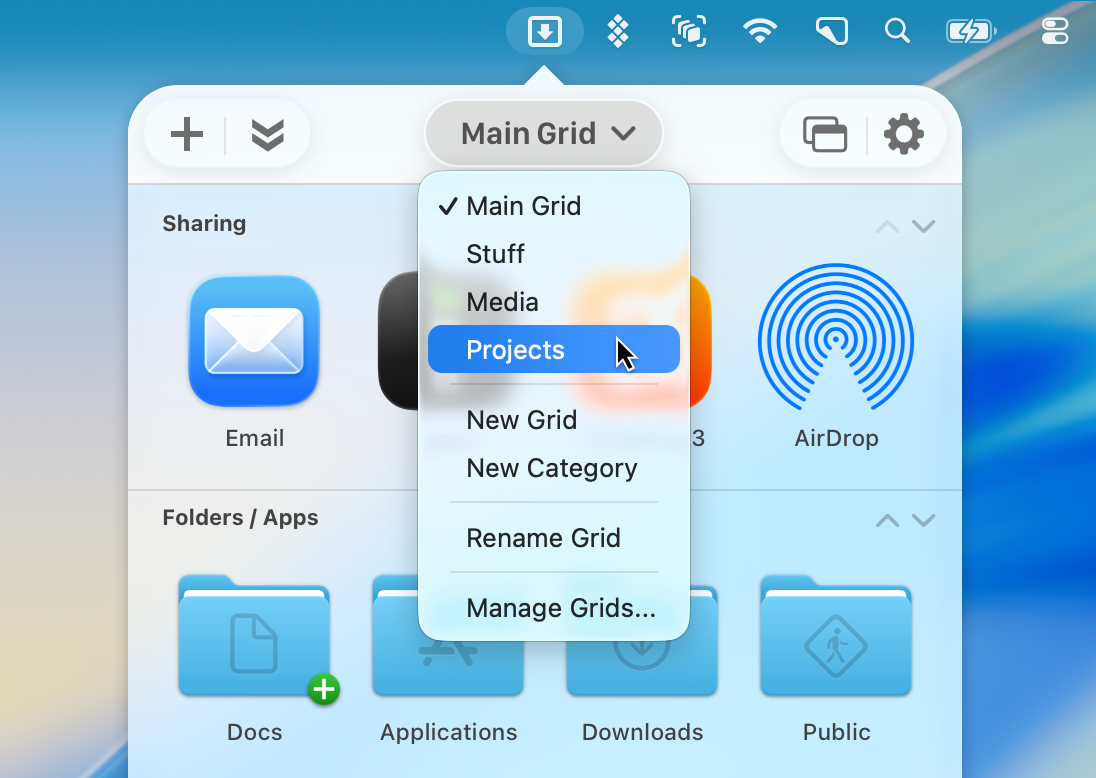
Dropzone 5 is a major update packed with changes, and I can’t wait to share them with you. To start, Dropzone 5 has been completely redesigned for macOS Tahoe. It features a beautiful new translucent look that fully takes advantage of Tahoe’s glass materials. The Dropzone 5 header has also been revamped with the new Tahoe toolbar style, and a brand-new grid selector has been added:
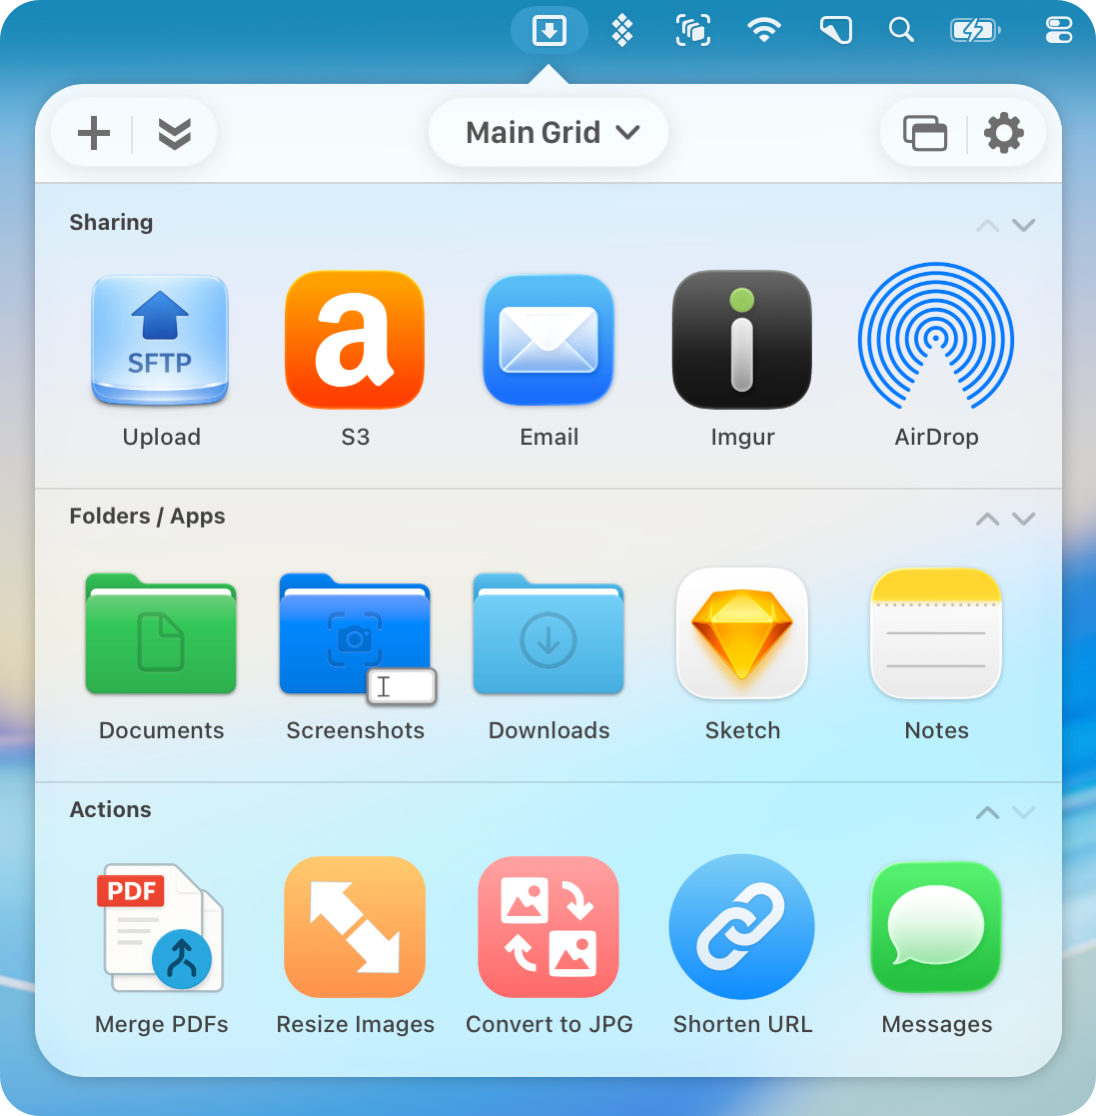
The new grid selector allows you to switch between multiple Dropzone grids. This feature will change the way you use the app; you can create separate Dropzone grids with different apps/folders/actions for different contexts and easily switch between them. You can set up a main grid for your most-used folders and apps, then create additional grids for blogging tools, video
production, different servers, or anything else you need.
The action grids themselves are also much more flexible now. Whereas in earlier versions of Dropzone you couldn’t edit the default categories, in this new version you can create as many categories as you want and move actions between categories. These changes takes Dropzone to a whole new level and make Dropzone much more flexible.
Dropzone’s Settings have been completely redesigned. In the new Grids section you can view and edit all the grids you have setup. Another long-requested feature, now finally included in Dropzone 5, is the ability to override the automatic column layout. You can manually adjust the number of columns in a grid using the stepper control in the right column:
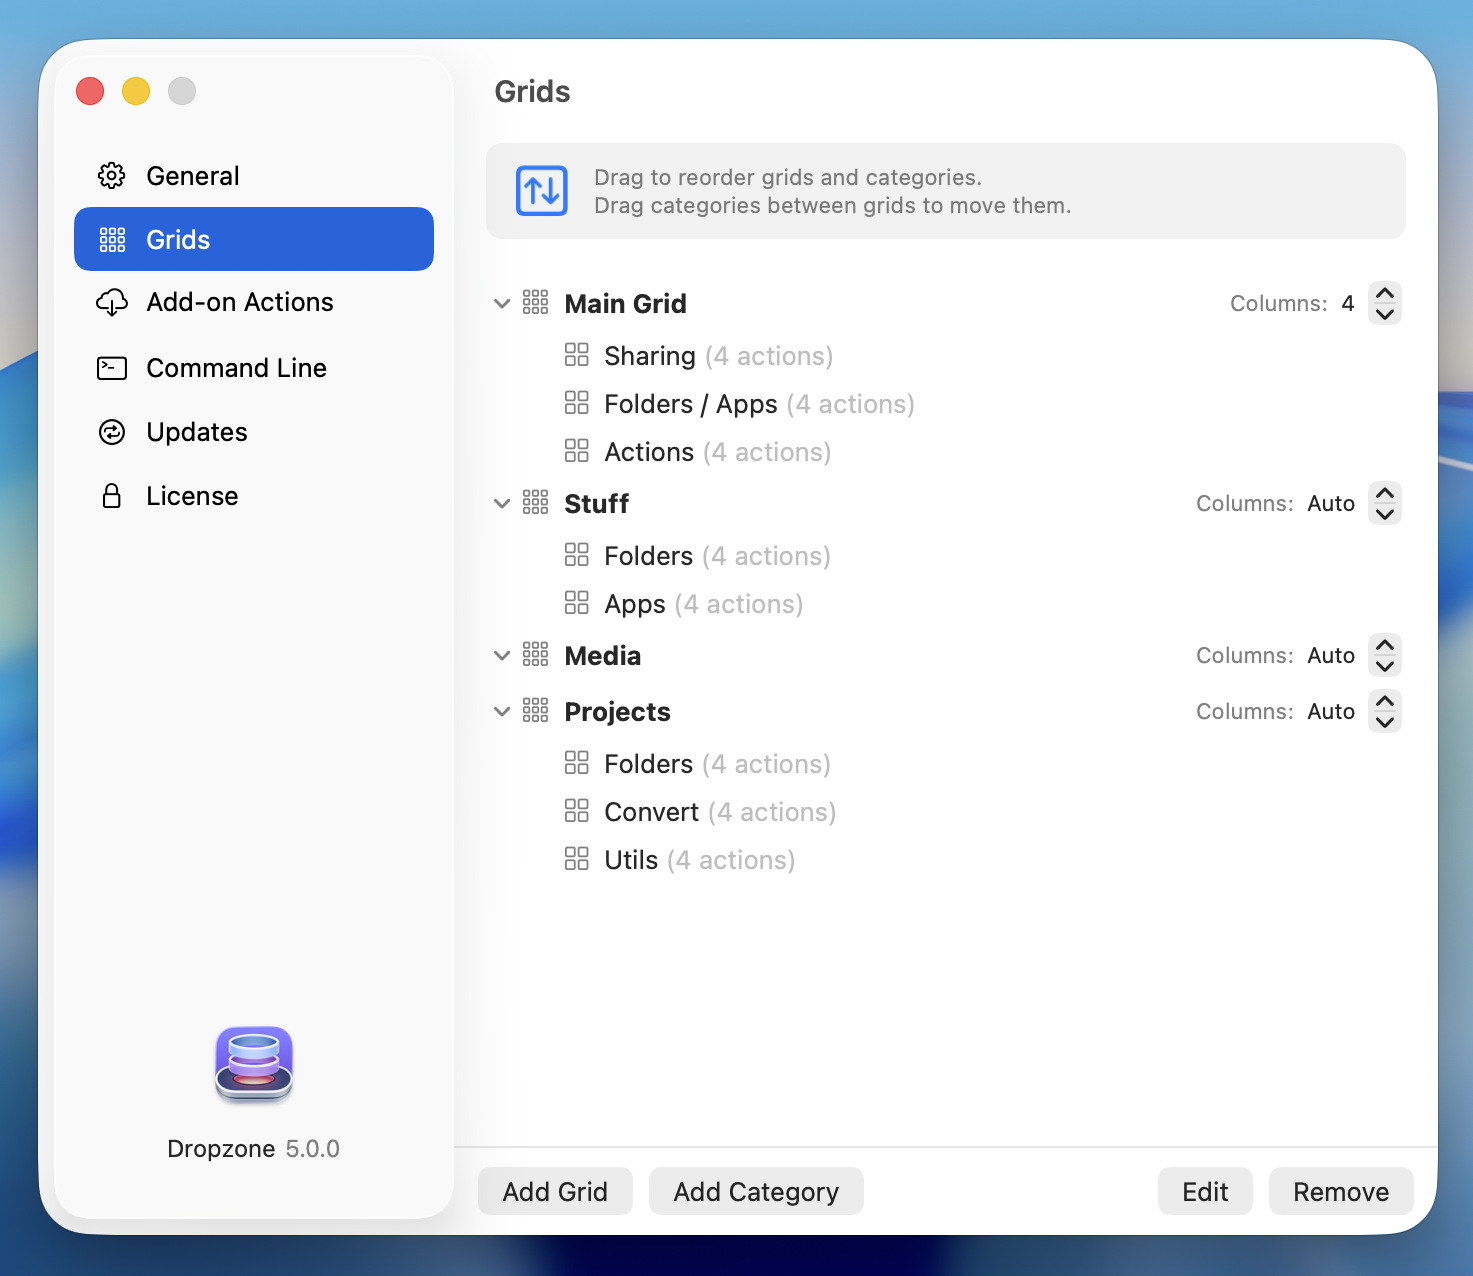
In the Grids section you can reorder grids and categories by dragging them and also easily move categories between grids. You can also reorder categories in the grid itself by clicking on the up/down chevrons which are to the far right of each category heading. Dropzone grid size is set in the General tab and this setting is preserved per grid giving you full control of how each grid displays.
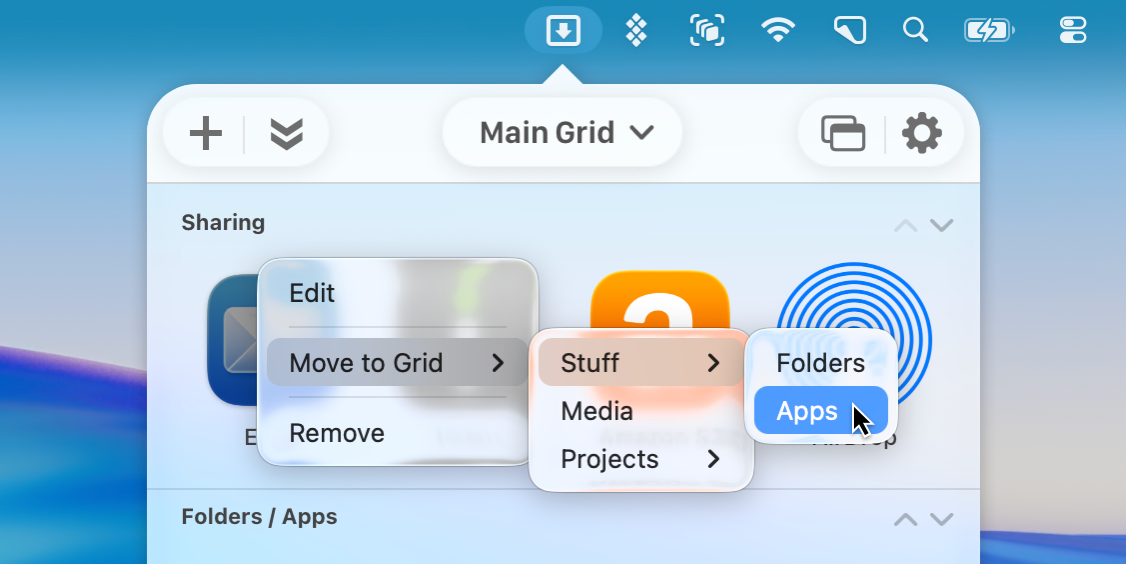
You can easily move actions and Drop Bar items to a different grid by choosing ‘Move to Grid’ from the right-click menu.
In macOS Tahoe, you can now assign custom colors, symbols, and emoji to folders, and now Dropzone 5 brings those customizations directly into your grids. It’s an easy way to make folder actions more visually distinct, and a fun way to customize your Dropzone grids even further:
There are many more enhancements in Dropzone 5 and we’ll also be rolling out lots of updates to Dropzone 5 in the future. Dropzone 5 is available today as a free download from aptonic.com, and it’s also available on Setapp and the Mac App Store.
Dropzone 5 Pro is available as a lifetime license for $35, with a limited-time launch price of $25. If you’re an existing Dropzone 4 customer, you can get discounted upgrade pricing of up to 50% off at aptonic.com/upgrade (or a completely free upgrade if you purchased within the last two weeks).
To get started, visit aptonic.com and click “Download Dropzone 5,” then extract the download zip file and move Dropzone to your Applications folder and run it. If you’re upgrading from Dropzone 4 your existing actions and preferences will all be migrated automatically.
Also, here’s a fun promo video we made for the launch to show off the new multi-grid support:
We hope you enjoy using Dropzone 5. If you have any feedback or questions, feel free to drop us a line at support@aptonic.com.
Create Apple Notes with Dropzone 4
Today we have released a new “Create Apple Note” action for Dropzone 4. Simply drag files or images onto the action, and a new note will be created in the Apple Notes app with those items attached. You can also choose a specific Notes folder when you setup the action. This allows you to add multiple instances of the action to your Dropzone grid—with each pointing to a different folder—so you can simply drop items onto the one you want and have new notes created for you in the correct folder. (Check out the video above to see this in action)
Installing the “Create Apple Note” Action
To start using the Apple Notes action, first make sure you’ve updated to the latest version of Dropzone. If you’re new to Dropzone, you can download the latest version here.
Once you have the latest version of Dropzone 4 installed, adding the action is easy:
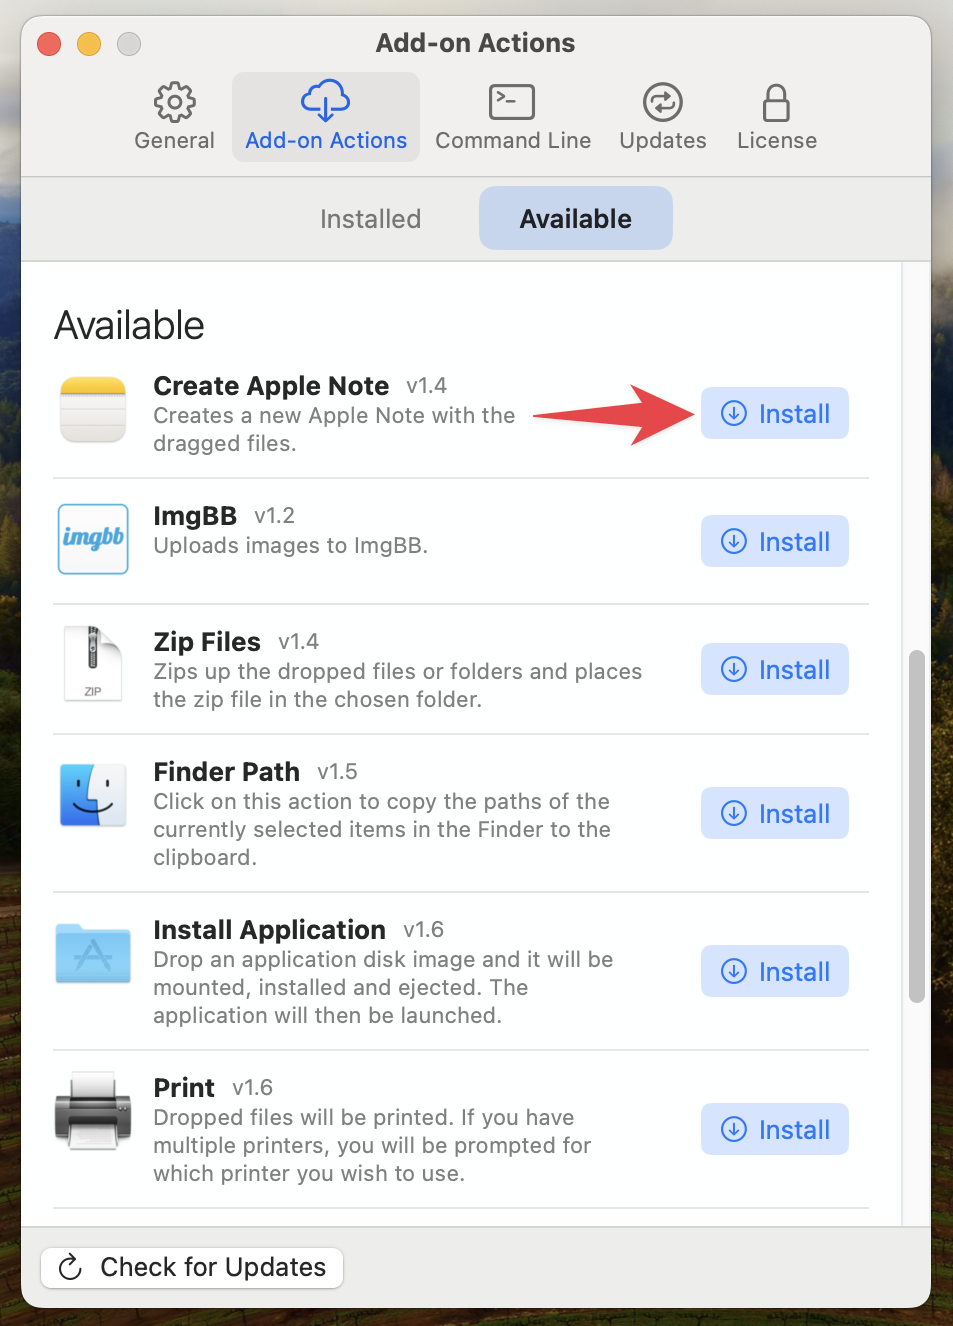
1. Open Dropzone 4’s settings and go to the Add-on Actions tab. In the Add-on Actions list, find the entry for Create Apple Note.
2. Click the Install button next to “Create Apple Note.” Dropzone will download and add the action to your grid. (See the screenshot below for reference.)
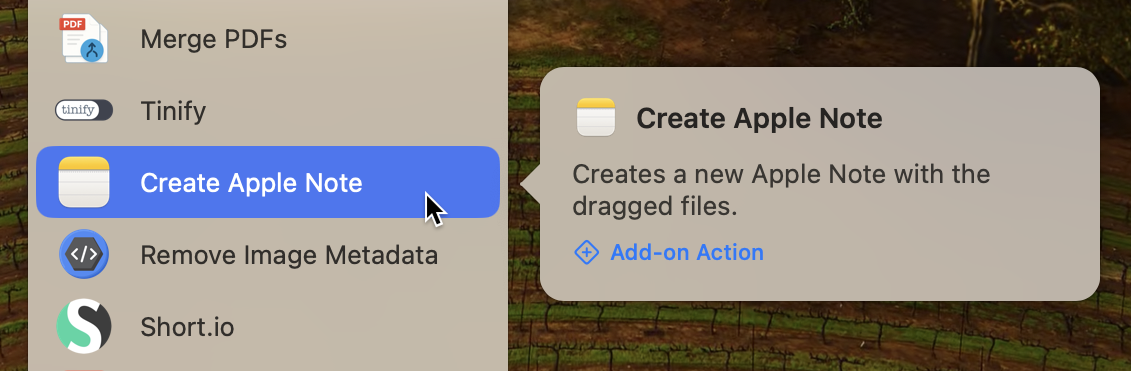
3. Configure the action. After installing, click the ‘Add to Grid’ button in the dialog that appears. You can also add it by clicking the white plus icon in the top left of the Dropzone grid and choosing ‘Create Apple Note’ from the Add-On Actions section of the menu:
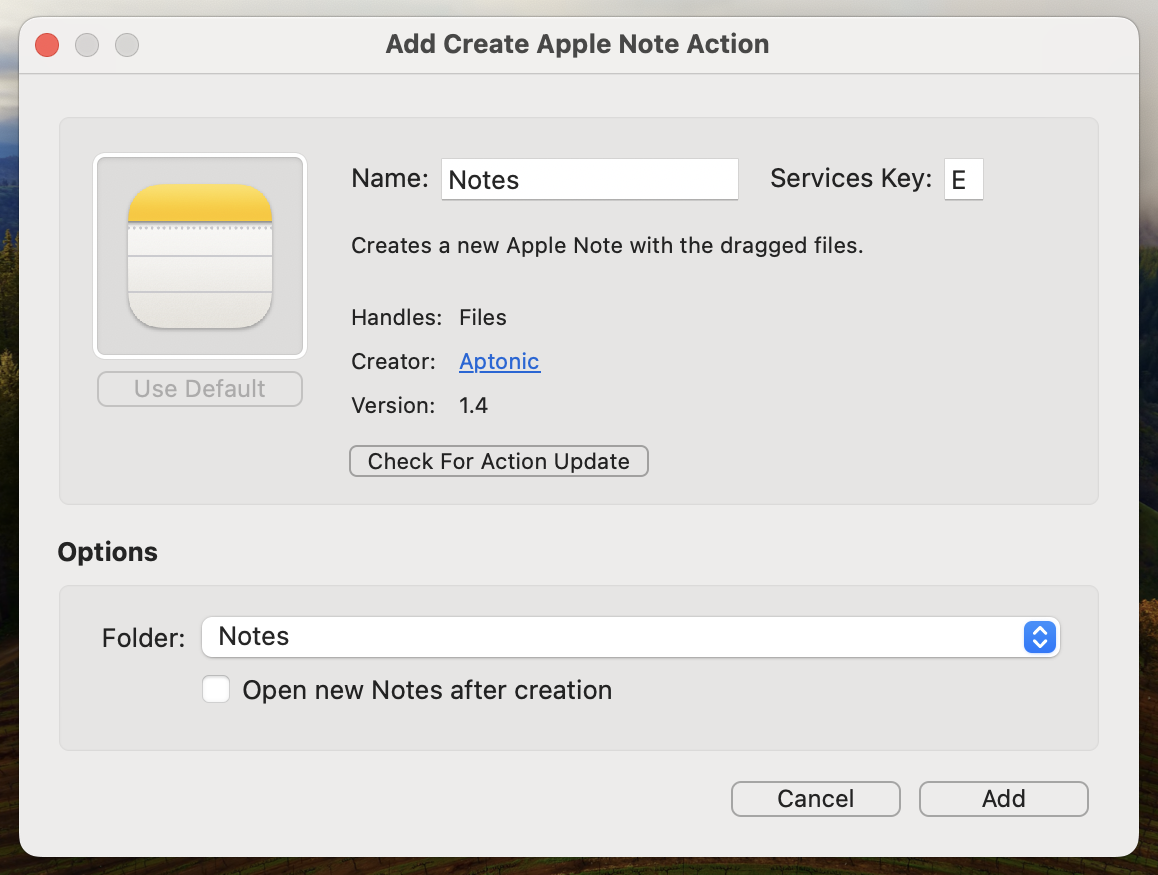
A configuration window will appear. Here you can choose which Apple Notes folder the new notes should go into. You can leave this set to your default “Notes” folder or any custom folder you have setup. (The screenshot below shows this configuration step.)
4. Finish up. Once you’ve selected a folder and clicked the ‘Add’ button, the Create Apple Note action will be added to your Dropzone grid, ready to use.
Using the Apple Notes Action
1. Drag one or more files onto the “Create Apple Note” action in your Dropzone grid (just like you would with any other action). You can drop images, documents, PDFs – any files you want to store in a note.
2. Dropzone will create a new note in Apple Notes in the folder you specified during setup. The note’s contents will include all the files you dropped. If you dropped multiple items, they’ll all be attached in a single note (images will appear inline; other file types will show as attachments).
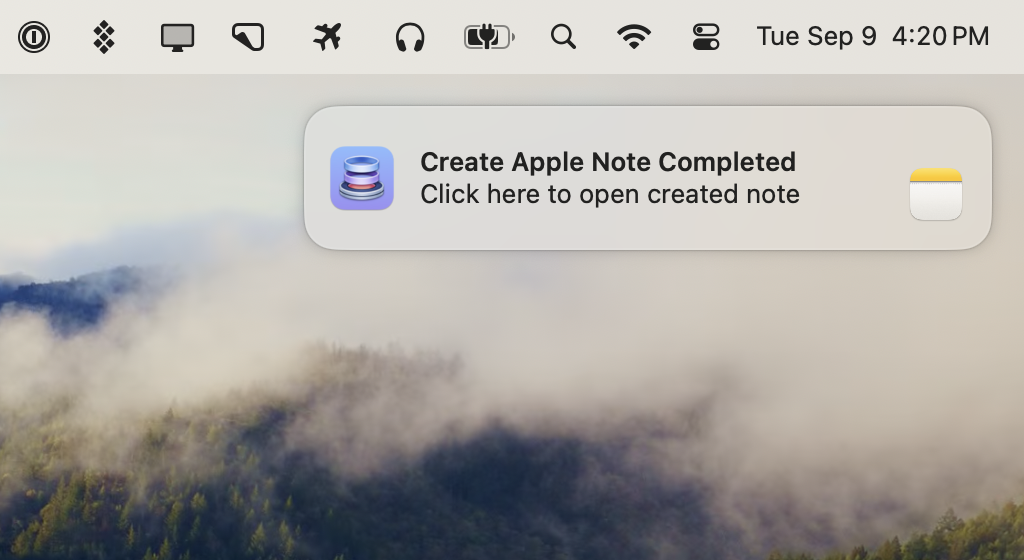
3. Look for the notification. After the note is created, Dropzone will display a notification letting you know it succeeded. If you’d like to view or edit the note immediately, just click the notification and your newly created note will open in the Notes app.
This Apple Notes action means you can, for example, collect research files or snapshots into Apple Notes without leaving your current app. Just drag them to Dropzone and they’ll be waiting in Notes for you, organized in the folder you chose. It’s a great way to quickly save receipts, inspiration images, or any bits and pieces to Apple Notes for later reference.
We hope you enjoy the new Create Apple Note action and that it helps make your workflow even smoother. As always, if you have any feedback or questions, feel free to drop us a line at support@aptonic.com.
Note: This action requires the non-Mac App Store (direct download) or Setapp version of Dropzone 4 due to sandboxing restrictions on the Mac App Store version. You need a Dropzone 4 Pro license or subscription to install add-on actions such as the Create Apple Note action. We hope you’ll consider supporting continued development and new actions like this by purchasing a Dropzone 4 Pro lifetime license or a subscription.
Introducing Floating Drop Bar in Dropzone 4
Today we’re thrilled to announce a major update to Dropzone 4 that is now available as a free update to all Dropzone 4 Pro users. If you’re new to Dropzone, this feature is also included as a part of a 14 day free trial when you download Dropzone 4.
If you already use Dropzone’s Drop Bar to gather files from across different apps, you’ll know how handy it is for staging a group of files before acting on them. Dropzone has just received a major update that makes Drop Bar even more powerful: you can now pop it out into a dedicated floating window that stays visible above all other windows. There’s a video to take you over how this feature works that you can watch above.
A Quick Refresher: What Drop Bar Does
If you haven’t used Drop Bar before, here’s a quick refresher of how Drop Bar works in Dropzone 4:
- You can drag files from different locations into Drop Bar and it keeps references to them so you can drag them into other apps, onto a Dropzone action or anywhere in Finder.
- You can combine files in Drop Bar into stacks so they travel together by dragging files in Drop Bar onto each other.
- You can rename a stack, preview with Quick Look and lock files in Drop Bar so they stay in Drop Bar after dragging elsewhere.
- You can reorder items in Drop Bar by dragging them around within Drop Bar.
- When you’re ready you can drag the Drop Bar the stack onto your destination which can be:
- A Finder folder to move or copy the originals (hold option to copy instead of move)
- Any app that accepts file drags
- Any Dropzone action
What’s New: A Detachable Floating Drop Bar Window
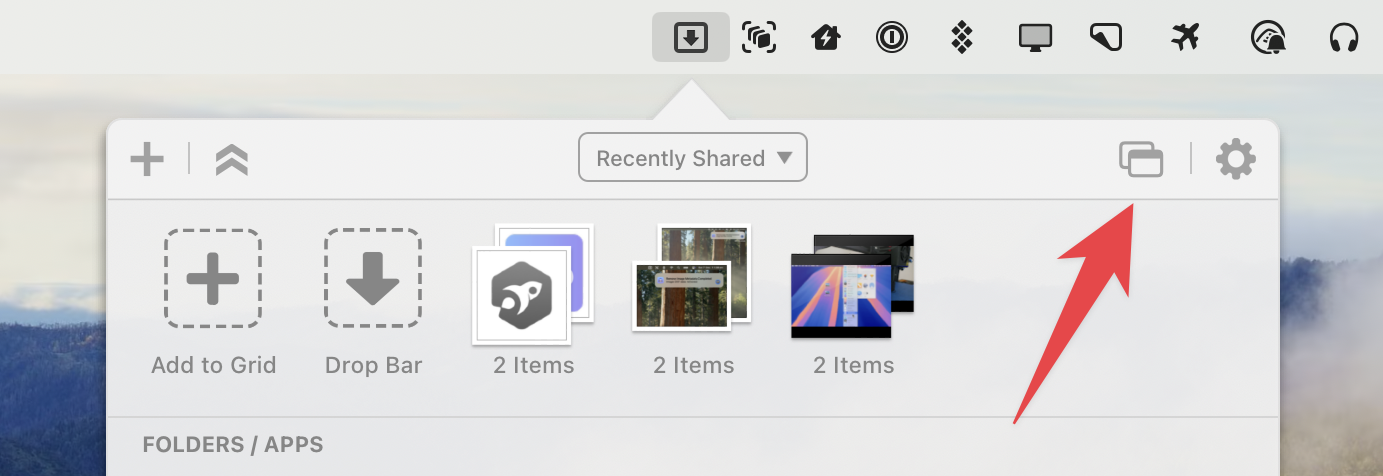
Click the new “Pop Out Drop Bar” button in the Dropzone grid and you’ll get a compact, always-on-top window that show the files you currently have in Drop Bar.
- You can position this floating window anywhere on screen and it will remember its last position across launches.
- Drag files straight onto the window from Finder, the desktop, or any other app.
- The files stay visible on screen in the floating Drop Bar.
- When you’re ready you can drag individual files or whole stacks out again—into a folder, into an app or onto a Dropzone action.
Floating Drop Bar Usage Examples
The floating Drop Bar mirrors the items in the main Dropzone grid but allows you to keep them visible and ready for dragging elsewhere without reopening the main Dropzone grid each time. Here are a few examples where the floating Drop Bar can save you a bunch of time:
| Everyday scenario | How the floating Drop Bar helps |
|---|---|
| Collecting file for a project that are spread across Downloads, Slack, and the web | Drag the files as you find them into the floating Drop Bar, then AirDrop the full set at once once you have everything you need. |
| Moving scattered project files into a new folder structure | Stage files in floating Drop Bar as you find them; then drag the stack into the final Finder folder when you’re ready. |
| Frequent operations on the same files (such as resizing, converting, uploading or emailing) | Drop files into the floating Drop Bar window, lock them in the Drop Bar stack by right-clicking on a stack and choosing “Lock Items,” then drag the files onto a Dropzone action or into an app. The items stay in Drop Bar so you can reuse them multiple times. |
| Temporary file “clipboard” while working with files for a current project | Keep the files you need visible in the floating Drop Bar instead of opening multiple Finder windows. |
Try Out Floating Drop Bar
To use the floating Drop Bar, first update Dropzone from the ‘Updates’ tab in Settings (or download the latest version from our home page). You can then open the floating Drop Bar by opening the Dropzone grid and clicking the new “Pop Out Drop Bar” button:
We think you’ll find it hard to go back to the old ways of juggling dozens of Finder windows.
Give it a spin and as always if you have any feedback or questions, email us at support@aptonic.com.
Introducing Command Line Integration in Dropzone 4
We’ve added a new way to interact with Dropzone 4 — a command line tool called dz.
dz lets you run Dropzone actions and manage Drop Bar from the terminal, making it ideal for scripting and advanced workflows.
Getting Started
First you’ll want to update to the latest version of Dropzone 4. Command line integration is available in Dropzone 4.80.49 and later. It is currently only available in the non-Mac App Store and Setapp versions of Dropzone 4. For the non-Mac App Store version you can check you’re running the latest version in the Settings > Updates tab. For the Setapp version you can update via the main Setapp app.
Once Dropzone is up to date, install the command line helper tool via the Dropzone Settings > Command Line tab as shown below:

Once installed just open a Terminal and type:
dzYou’ll see a list of commands for interacting with Dropzone:
Command line interface for Dropzone

USAGE:

Actions:
  dz list                                   List your Dropzone actions
  dz run NAME EVENT [FILES...]              Run a Dropzone action with optional files
                                            EVENT must be either "dragged" or "clicked"

Drop Bar:
  dz list-items [--json]                    List all items currently in Drop Bar
  dz add [--stack] [FILES...]               Add files to Drop Bar, optionally stacking them
  dz rename INDEX [NEW_NAME | --reset]      Rename or reset name of a Drop Bar stack by index (starts at 0)
  dz remove INDEX                           Remove a Drop Bar stack by its index (starts at 0)
  dz lock INDEX                             Lock a Drop Bar stack by its index (starts at 0)
  dz unlock INDEX                           Unlock a Drop Bar stack by its index (starts at 0)
  dz clear                                  Clear all items currently in Drop Bar

UI:
  dz open                                   Open the Dropzone grid
  dz close                                  Close the Dropzone grid
  dz open-dropbar                           Open the floating Drop Bar grid
  dz close-dropbar                          Close the floating Drop Bar grid

  dz help                                   Show this help message
dz list: List your Dropzone grid actions
This command lists all the actions you have setup in your Dropzone grid. All actions and folders/apps can be used via the CLI.
dz listExample Output:
Available Dropzone Actions:
---------------------------
AirDrop
ImgBB
Install App
Move to Downloads
dz run: Trigger Actions from Terminal
Example: Upload an image to ImgBB:
dz run "ImgBB" dragged ~/Desktop/test.pngNote: “dragged” simulates dropping a file on the action. You can also use “clicked” to simulate a click without files.
Another example, to install a .dmg using your “Install App” action:
dz run "Install App" dragged ~/Downloads/MyApp.dmgdz add: Add Files to Drop Bar
You can add files to the Drop Bar from Terminal — great for placing the output from a script in a place where that you can drag into Finder or another app. You can simply provide a list of paths or files to add:
dz add image1.png image2.pngdz clear: Empty the Drop Bar
To remove all files from Drop Bar:
dz clearExample Script: Take a screenshot and upload
Here’s a bash script to take a screenshot of a selected area of the screen and upload it to ImgBB using Dropzone. The URL of the uploaded screenshot will be automatically placed on the clipboard.
#!/bin/bash

screencapture -i ~/Desktop/snap.png
dz run "ImgBB" dragged ~/Desktop/snap.png
rm ~/Desktop/snap.png
We hope you find the new dz tool useful for your own scripts and automations.
Let us know if you have any feedback or questions by emailing us at support@aptonic.com.
ImgBB action released for Dropzone 4
We’re excited to introduce a new Dropzone 4 action that makes uploading images to ImgBB easier than ever. ImgBB is a simple and reliable image hosting service that lets you upload images and share them via direct links. Now, with the new ImgBB action for Dropzone, you can upload images instantly—just drag and drop onto the action, and your image URL is copied to the clipboard, ready to share.
Normally, uploading images to ImgBB requires opening a browser, navigating to the site, and manually selecting your files. With this new Dropzone action, you can skip all that. Just drop an image onto the action in Dropzone, and it will upload automatically in the background. Once uploaded, the image URL is copied to your clipboard, so you can paste it anywhere—emails, chats, social media, or forums—without any extra steps.
ImgBB is known for being a straightforward, no-nonsense image host (unlike some alternatives that bombard viewers with ads or compress your images). By uploading through this action, you get the benefit of ImgBB’s speed and simplicity directly from your desktop.
Key Features
- Drag & Drop Uploads: Drop images onto the action, and they’ll upload instantly to ImgBB.
- Clipboard Integration: The image URL is automatically copied for easy sharing.
- Auto-Delete Option: Set images to delete after a specific period (from 5 minutes to 6 months) or keep them permanently.
ImgBB Pricing & Limits
ImgBB offers a free plan with a 32 MB upload limit per image. Images remain hosted indefinitely unless you set an auto-delete timer. If you need higher limits, ImgBB Pro increases the file size limit to 64 MB per image and removes ads. Pricing starts at $12.99 per month, with discounts for annual and multi-year plans.
How to Get the Action
This action requires Dropzone 4 Pro. You can install it in two ways:
- Download it from the Aptonic Actions Repository: Install ImgBB Action
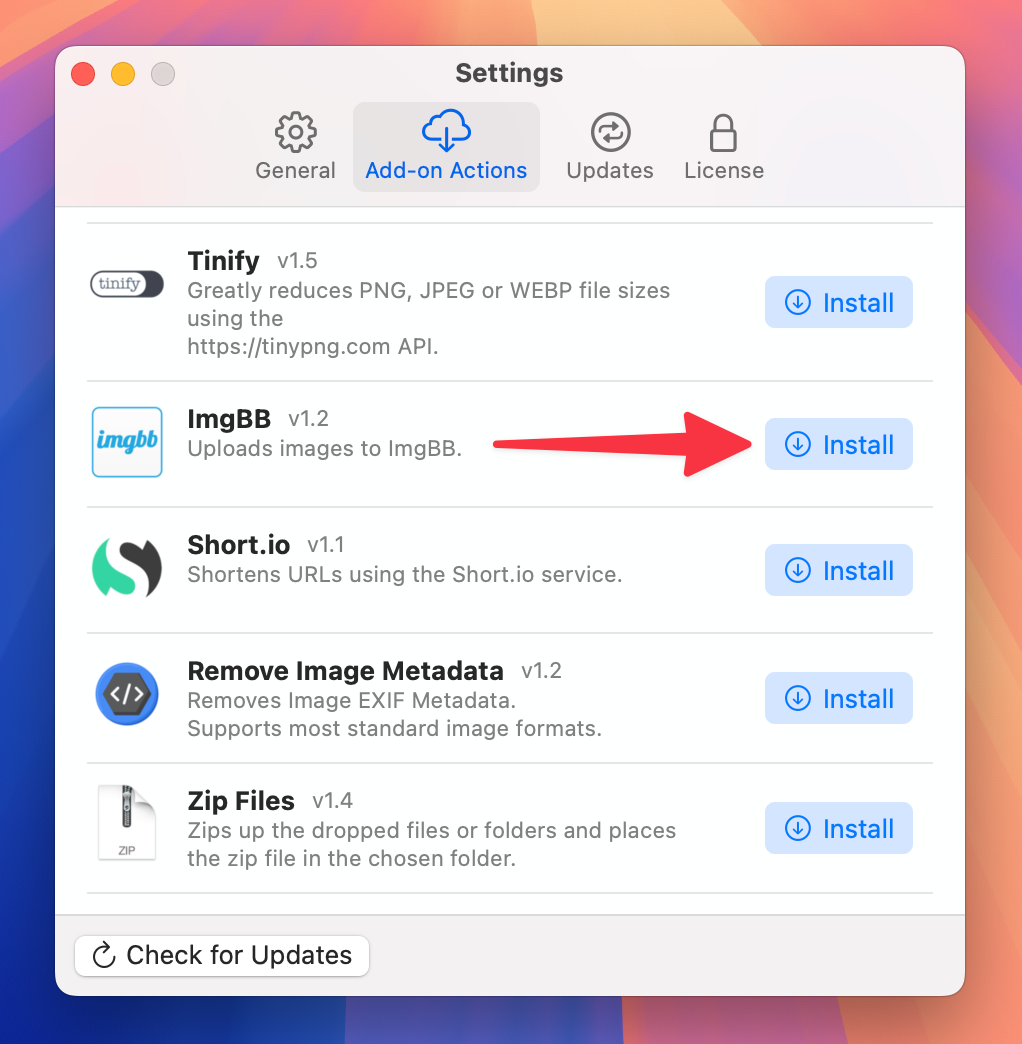
- Find it inside Dropzone: Open Dropzone Settings > Add-on Actions and click the Install button beside the ImgBB action.
Once installed, simply configure your ImgBB API key (available for free on the ImgBB website), and you’re ready to upload images instantly.
Give it a try and simplify your image-sharing workflow today!
Easily remove metadata from images with Dropzone 4
When you share images with others or post them online, there’s often more info embedded in the file than you realize. As well as the image data, images contain EXIF metadata—details like camera models, capture times, GPS coordinates, and other personal information. Thanks to the new “Remove Image Metadata” action in Dropzone 4, you can now quickly and easily erase these hidden attributes before sharing your images.
What is EXIF Image Metadata?
EXIF (Exchangeable Image File Format) metadata is a set of details automatically recorded by your camera or smartphone whenever you take a photo. This information can range from technical specifications (such as shutter speed, ISO, and focal length) to sensitive data like GPS coordinates. While this info can be useful for keeping track of camera settings and conditions, you often don’t want this info included in images you share with others.
Why Remove EXIF Metadata?
There are several reasons why you might want to remove EXIF metadata from your images:
1. Privacy Concerns: If GPS coordinates are embedded, someone might trace the exact location where a photo was taken. Stripping this data helps protect your privacy when you share images online.
2. Smaller File Sizes: Removing metadata can slightly reduce the file’s overall size, allowing for faster uploads and more efficient storage.
3. Cleaner Public Sharing: Sometimes you would prefer to keep the details of how or where the image was created private. Removing metadata ensures that only the final image is shared, free of any extra information.
Adding the Remove Image Metadata Action to Dropzone
1. Click the + icon in the top-left corner of the Dropzone grid.
2. Select Get More Actions… from the menu.
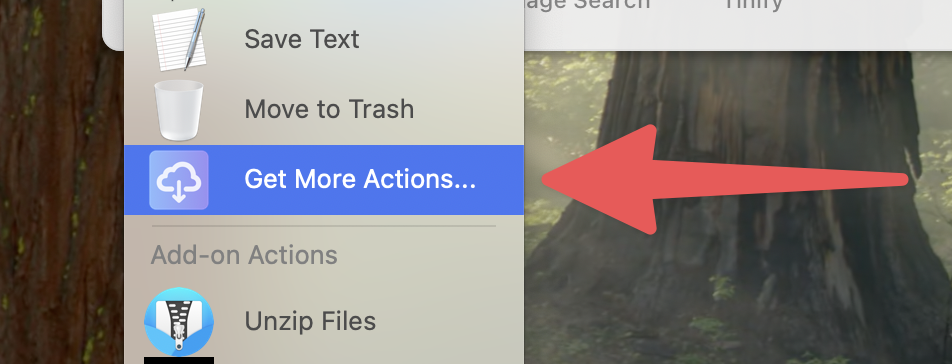
3. Click Install beside the Remove Image Metadata action.
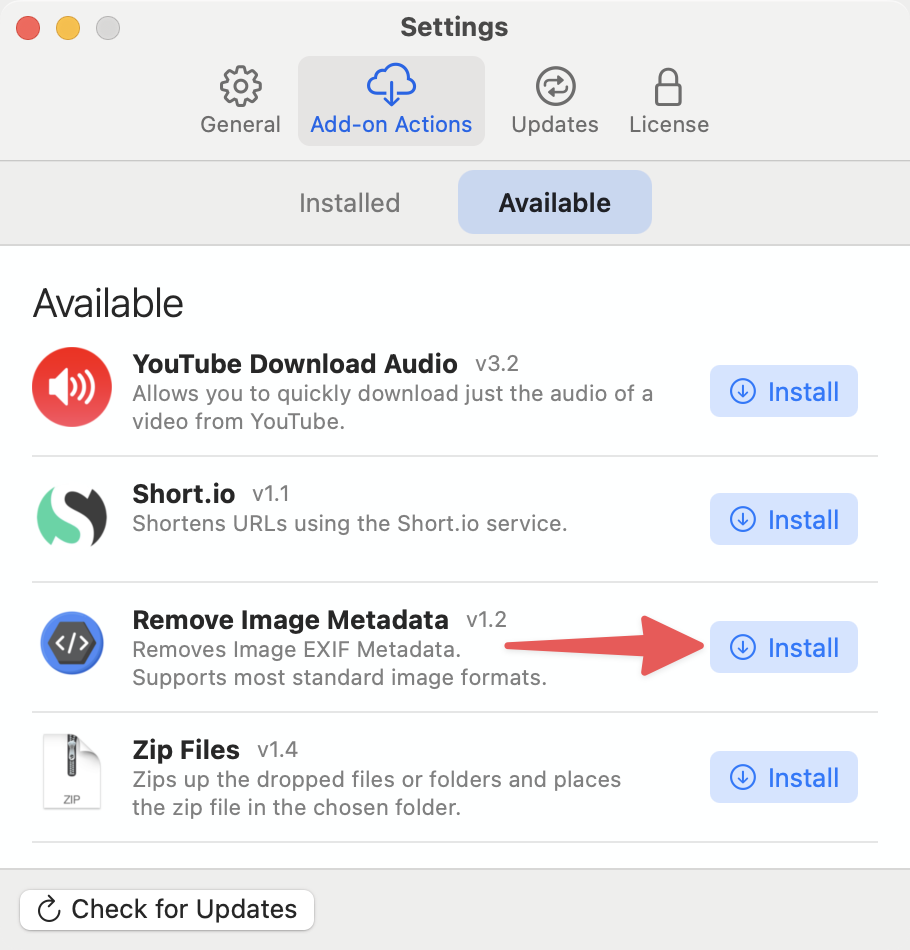
4. The action will download and install automatically.
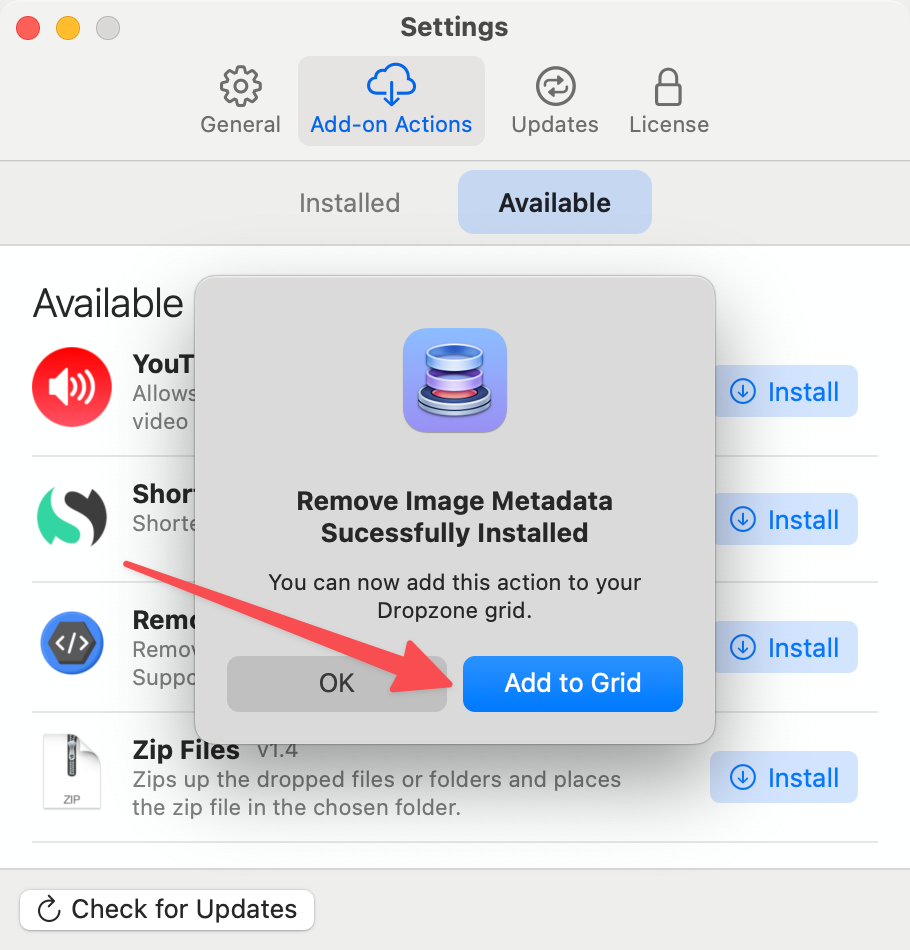
5. Click Add to Grid on the dialog that appears.
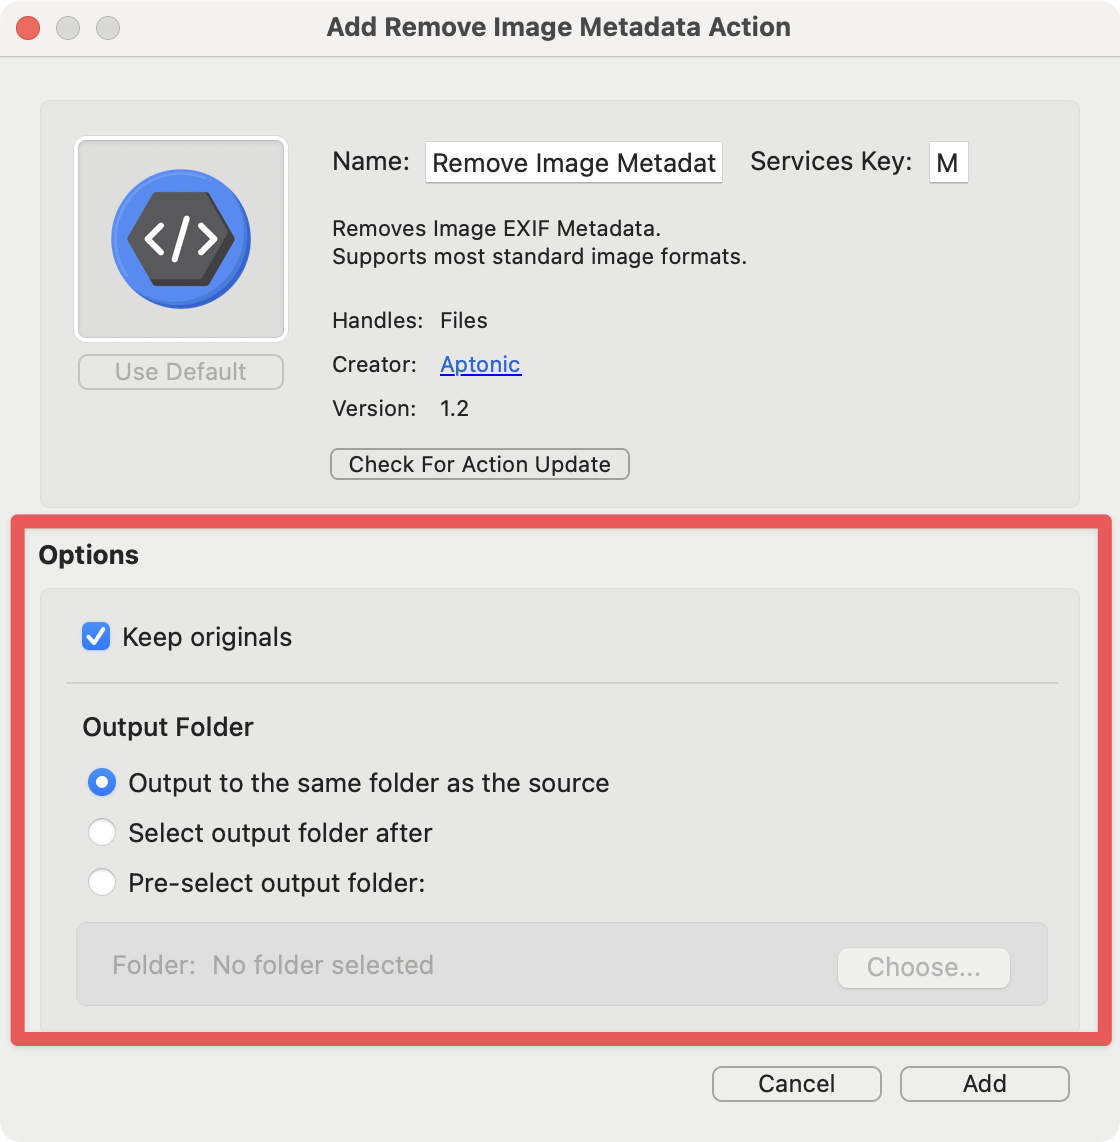
6. Choose where to save the images with metadata removed and whether to keep the originals.
Using the Remove EXIF Metadata Action
Once the action is installed, using it is straightforward:
Take any image—or multiple images—from Finder and simply drag them onto the “Remove Image Metadata” action in your Dropzone grid.
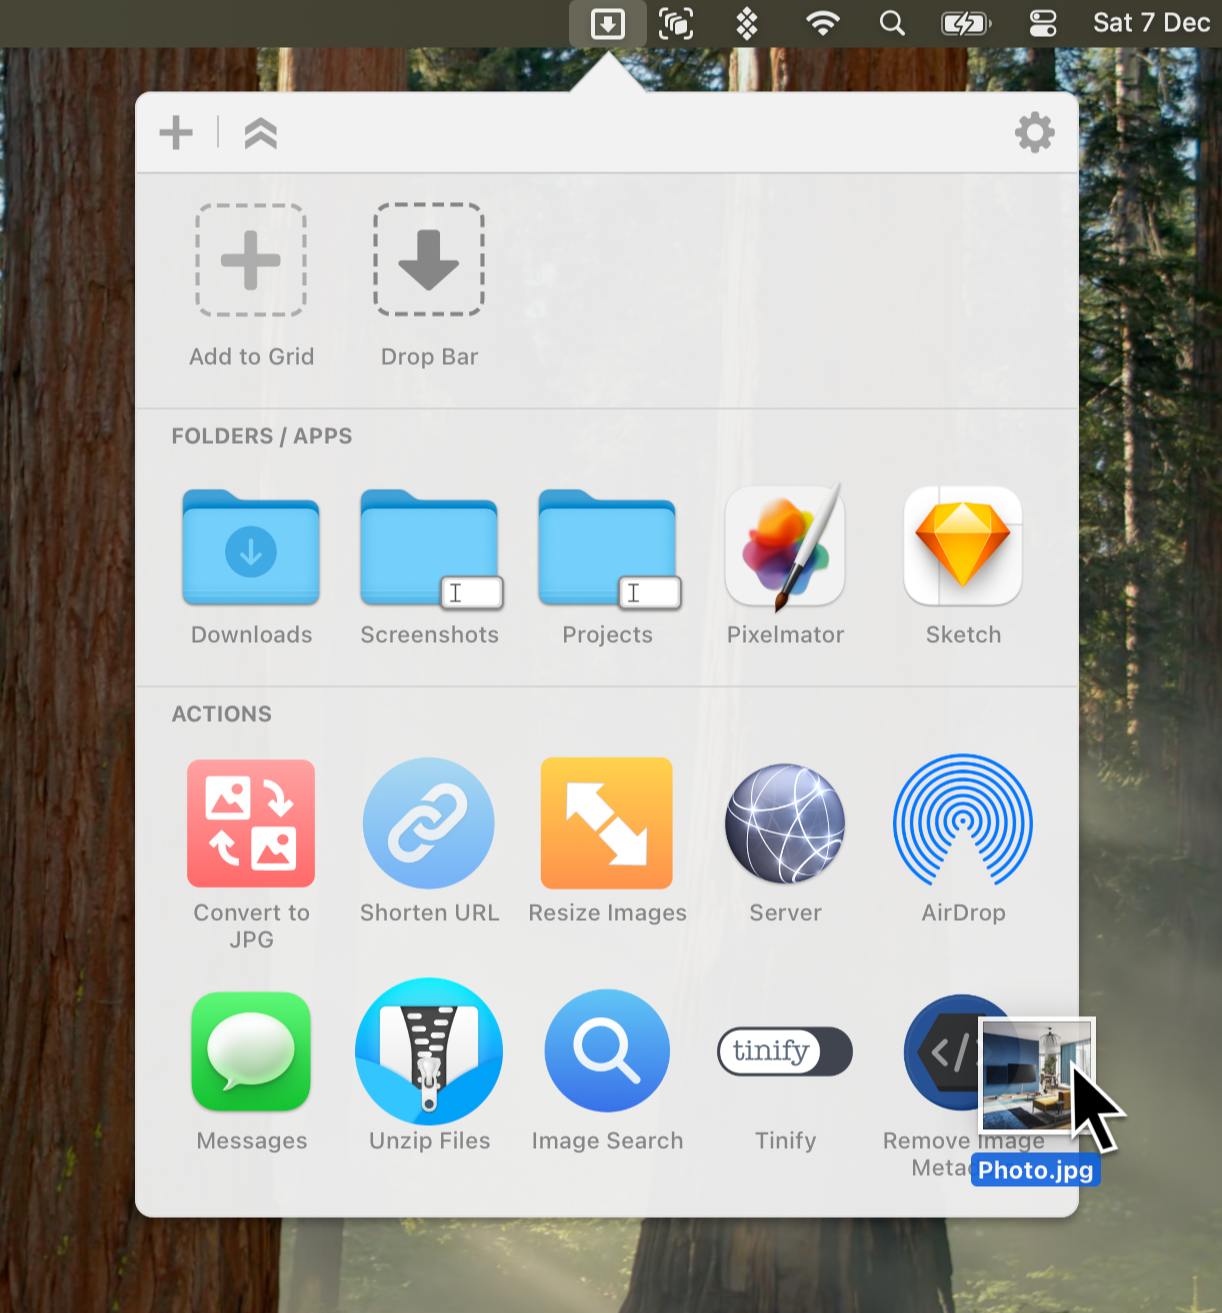
The image is converted and the output saved to the set output folder:

We hope you find this new action useful. If you have any feedback you can email us at support@aptonic.com
Easily convert images between different formats with Dropzone 4
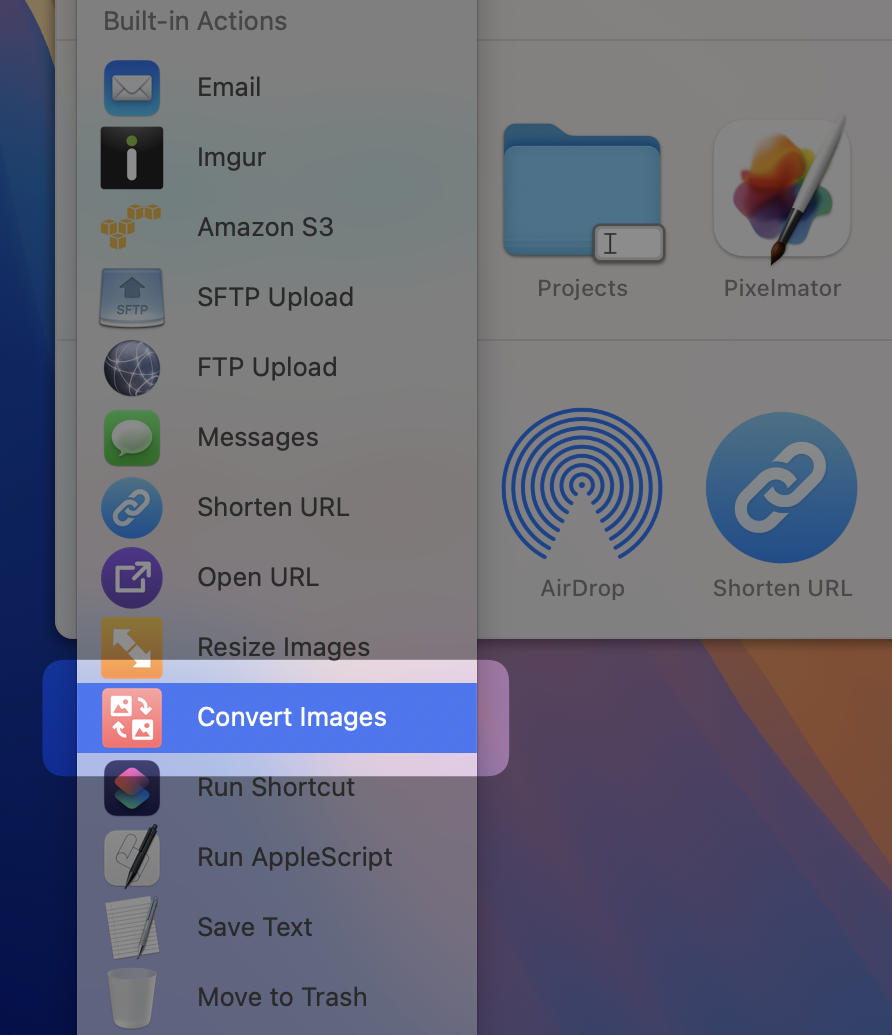
In a recent update we have added a new ‘Convert Images’ action that allows easily converting images between different formats. You can add this action by clicking the white plus in the top-left of the Dropzone grid and choosing ‘Convert Images’ from the Built-in Actions section.
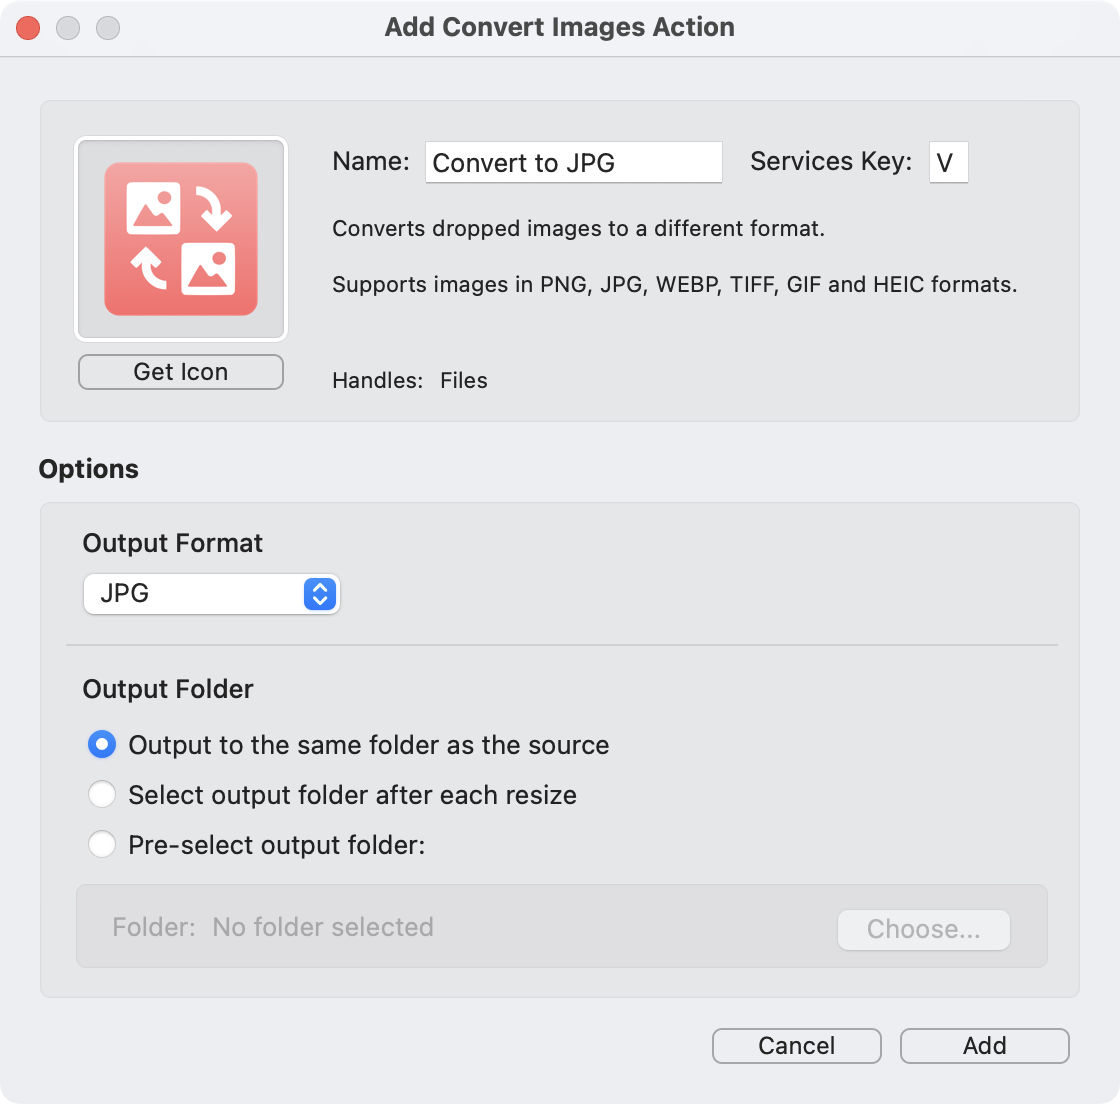
This will bring up the action configuration where you can set the output format and destination folder:
The action will then be added into your Dropzone grid:

You can then drop images onto the action in your grid and they will be converted to the chosen output format.
Convert images is a Dropzone 4 Pro action, although you can still try this out for free in the trial version of Dropzone 4 Pro. The convert images action is available in version 4.80.21 and later.
We hope you enjoy the new action. If you have any feedback you can email us at support@aptonic.com
Auto convert videos downloaded with the Dropzone YouTube Downloader action to H.264
YouTube has made it increasingly difficult to download H.264 encoded versions of videos. This has caused issues for some Dropzone 4 YouTube Downloader action users, as you can’t directly play the downloaded videos using QuickTime or Quick Look since they are encoded with the VP9 codec, which macOS doesn’t natively support. To play VP9 encoded videos, you need to download a player that supports the VP9 codec, such as VLC. There are other disadvantages to VP9 encoded videos on macOS as well—for example, you can’t directly use the downloaded videos in Mac apps like Final Cut Pro.
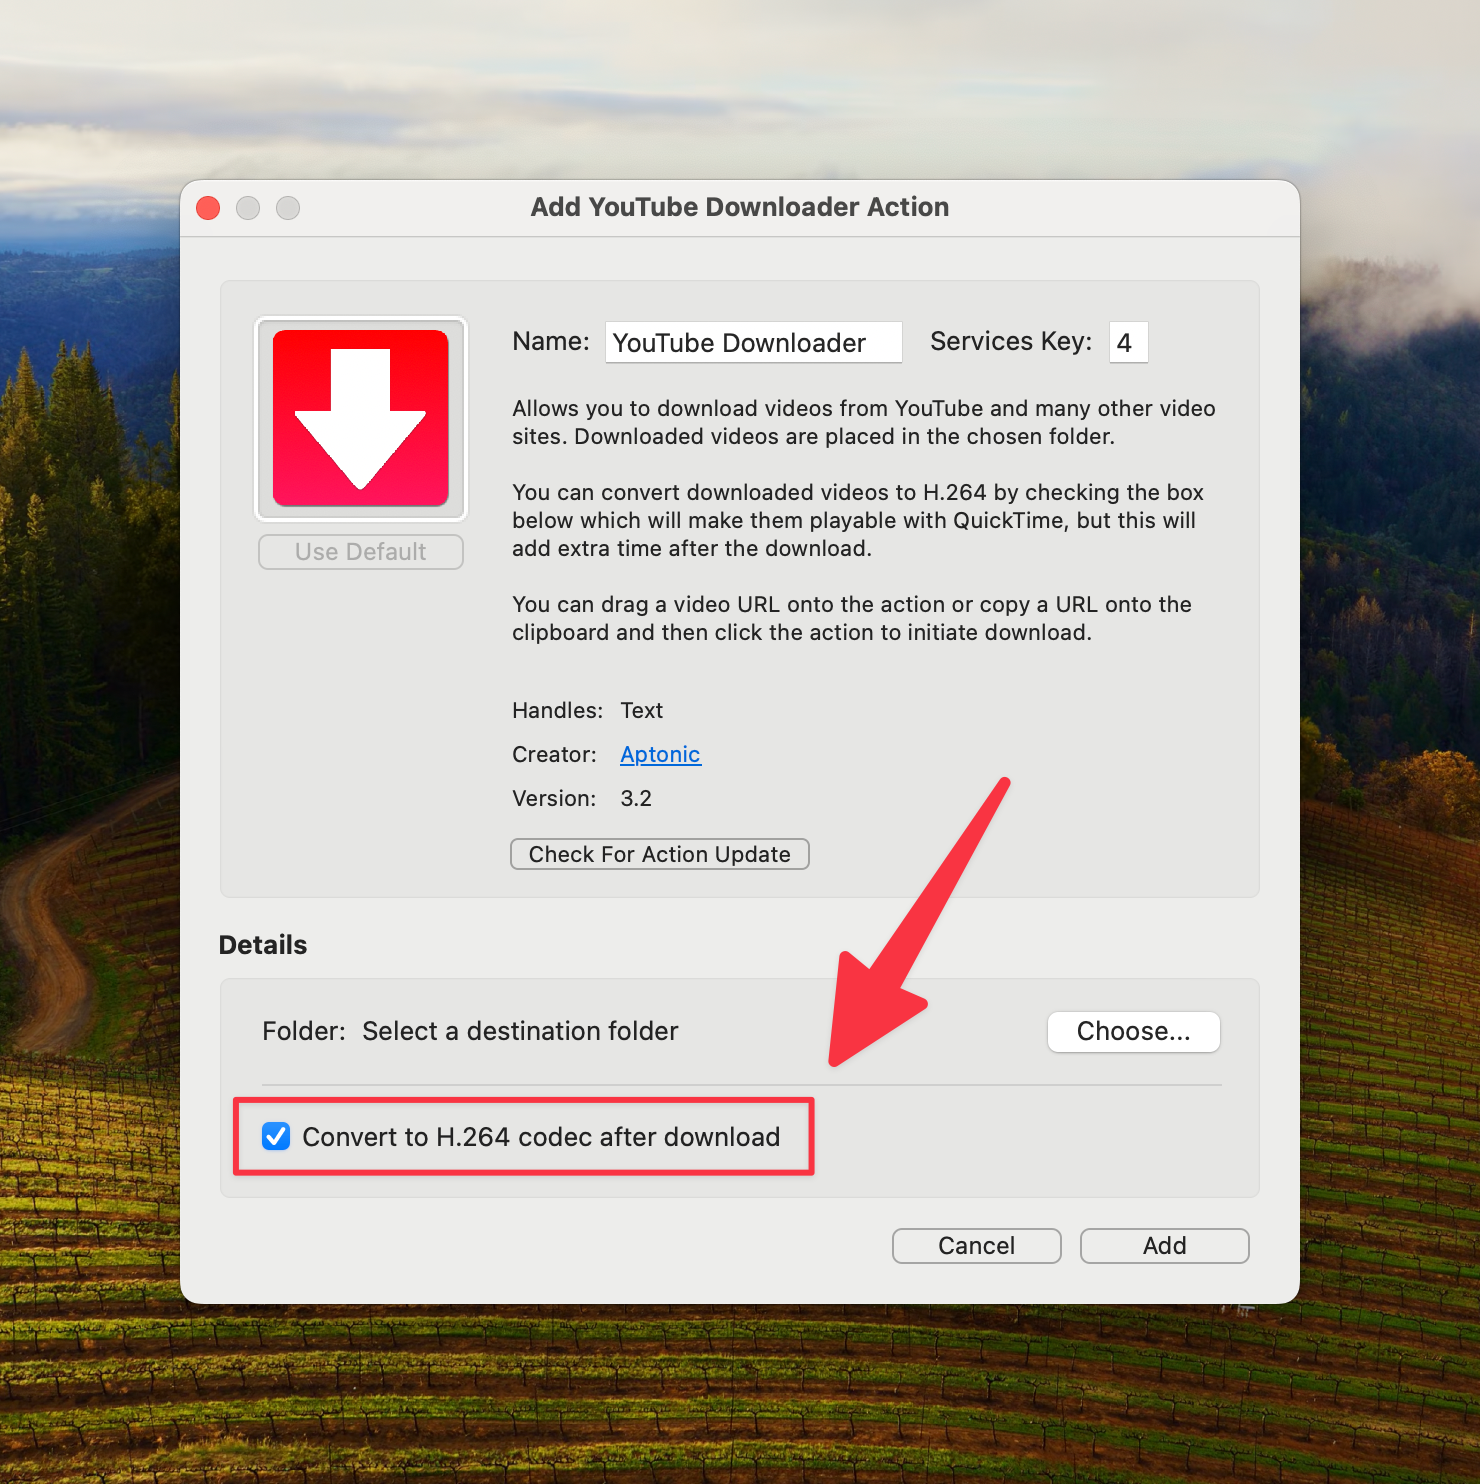
We have implemented a solution in Dropzone 4 that allows you to automatically download and convert YouTube videos to the H.264 codec, making them fully compatible with macOS built-in codecs. This option can be easily enabled by right-clicking on the YouTube Downloader action in your Dropzone 4 grid and checking the ‘Convert to H.264 codec after download’ checkbox, as shown below:
The only downside to this is that you have to wait a little longer for the conversion process after the download, although on most modern Macs, this usually doesn’t take too long. We’ve made this an option so that you can decide if the extra wait time for conversion is worth it for your use case. Conversion to H.264 is disabled by default currently.
You will need to make sure you’re running Dropzone 4.80.18 or later and version 3.2 or later of the YouTube Downloader action for this option to be available. You can install the latest version of the YouTube Downloader action from this page. You can check you’re on the latest Dropzone version by going to the Dropzone Settings and then going to the updates tab. The YouTube Downloader action is only available for the non-Mac App Store version of Dropzone 4 downloaded directly from our website or in the Setapp version.
ScreenSnapAI Released
Today after many months of development and weeks of beta testing we’re excited to announce the release of ScreenSnapAI.
ScreenSnapAI is a tool that uses the latest in AI technology to process screenshots and images. The brand new icon for ScreenSnapAI is above and was designed by the talented Matthew Skiles.
It’s easiest to show you how it works, so here’s a 1 minute demo:
The app has already undergone several major updates in response to beta testing feedback and has rapidly evolved into a powerful tool that allows you to have conversations with AI about anything on your screen.
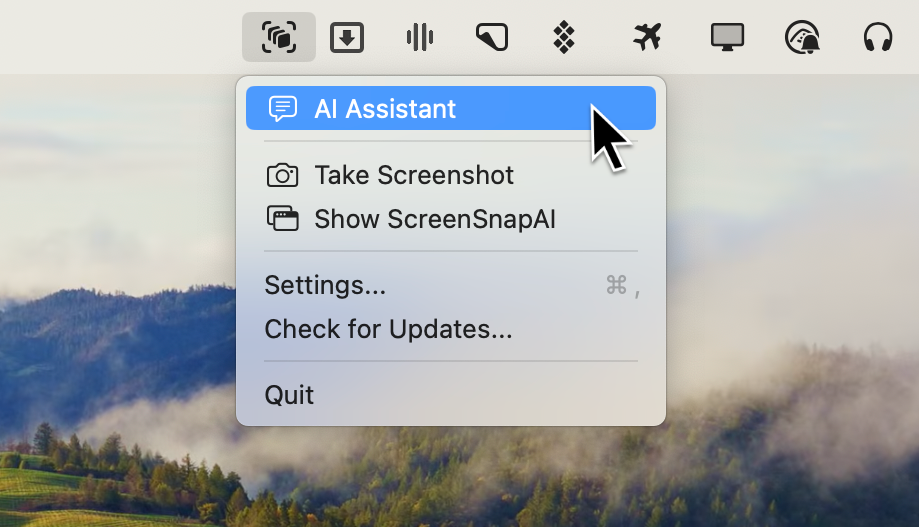
You can trigger the ScreenSnapAI assistant via a hotkey set in the app settings or through the menu, as shown below:
When you activate ScreenSnapAI, it will allow you to select a screen area, and then you can choose an AI task to perform. You can also enter your own custom task.
As an example, let’s say I want to translate some Japanese text in an image to English. I simply drag over the text and choose ‘Translate to English’:
ScreenSnapAI will then work its magic and begin a chat about the screenshot, presenting the result in a message. The image is automatically added to the conversation, and you can continue to ask the AI questions about it. This is a fantastic way to start a conversation with AI about anything you have on your screen.

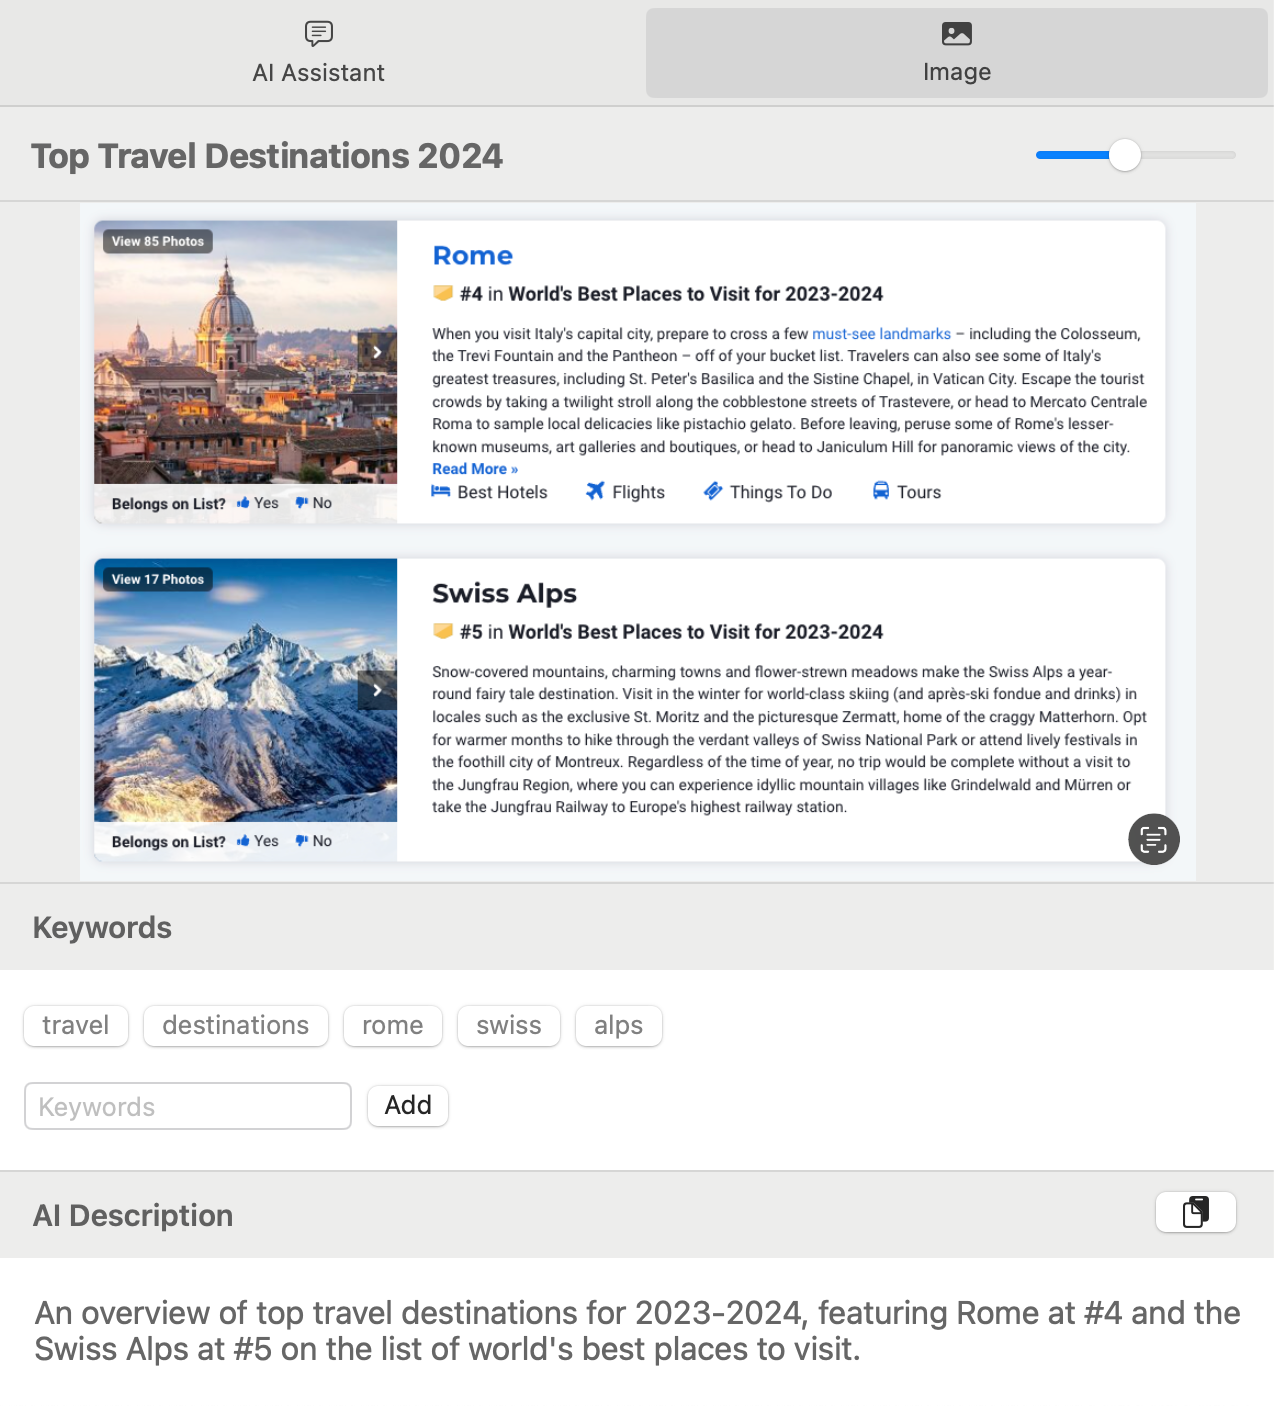
Whenever you capture images with ScreenSnapAI, it will generate an AI name, keyword, and description for you, making it easy to find screenshots later. You can find these details in the Image tab:
ScreenSnapAI uses the latest AI models provided by OpenAI to process your images. If you want to try out the app, the easiest way to get started is by downloading it from the Mac App Store:

We’ve handled all the integration with OpenAI for you, so you don’t need to worry about API keys or anything like that. You can try out the app for free, and the Pro version is only $10 USD, which includes 50 AI processing credits. You use one AI credit per image processed or per question asked. You can easily add extra AI credits as needed via an in-app purchase. Currently, 100 AI credits cost $5 USD.
If you’re a more advanced user, you can bring your own OpenAI API key by downloading the non-Mac App Store version of ScreenSnapAI from here. The ScreenSnapAI Pro non-Mac App Store version is currently $14 USD. This is a one-time purchase, and you can then manage your own OpenAI costs directly with OpenAI.
You can learn more about ScreenSnapAI on its new website. Please feel free to email us at support@aptonic.com with any questions or feedback. We look forward to hearing what you think of our latest creation. We have big plans for the app, and this is really only the beginning.